Understanding the Different Phases of Home Construction

A new home doesn’t appear in one grand gesture. It takes shape through a sequence of phases—each with its own goals, inspections, materials, and decisions. When you understand that sequence, you can anticipate what’s coming next, make timely choices, and spot problems while they’re still cheap to fix. This guide walks through the end-to-end home construction phases in the order you’ll actually experience them: from pre-construction planning to punch list and move-in, with plain-English explanations of what’s happening, who’s on site, how long things typically take, where schedules slip, and how to keep quality high without slowing the calendar.
If you’re building for the first time, think of this as your field manual. It translates technical steps into practical checkpoints, lays out the critical path items that control your timeline, and shows you what decisions must be made in each phase so you’re not scrambling when a truck is idling in your driveway. The result is a build that feels organized rather than improvised—and a finished home that performs as well as it looks.
Phase 0: Pre-Construction (Financing, Design, Permits, and Bids)
Before a shovel touches dirt, you’re on the pre-construction clock. This is where you line up financing, finalize design and selections, obtain permits, and award the job to a general contractor (or a design-build firm). It’s tempting to rush here, but solid pre-construction compresses everything that follows.
Your focus in this phase is documentation: a complete plan set, a clear spec book naming products and installation standards, and a selections schedule for windows, doors, cabinets, appliances, tile, flooring, and fixtures. The more you decide now, the fewer mid-build delays you’ll face. Your builder should also build a procurement plan that lists long-lead items (windows, exterior doors, cabinets, some HVAC equipment) with order dates keyed to the schedule. Permits and HOA approvals live here too; each jurisdiction has its own cadence, so build buffer time into your expectations.
What success looks like in Pre-Construction
You hold a signed contract with attachments (plans, specs, schedule, draw schedule, insurance certificates), decisions on all major selections, and purchase orders released for long-lead items. Your builder has a baseline schedule and a three-week look-ahead. You have a single folder—digital or binder—where every decision and model number lives. That organization is your first schedule win.
Phase 1: Site Prep and Layout
Site prep turns a raw lot into a work platform. Crews install silt fencing and other erosion controls, stake the building corners from the survey, clear trees and brush inside the work zone, rough-grade the site, and cut a stable construction entrance so trucks don’t sink after rain. Temporary utilities—power pedestals, water access, and portable sanitation—arrive now. If you’re on septic, the septic field location is flagged and protected; well drilling may happen before or after framing depending on access and local norms.
Two things drive quality in this phase: accurate layout and thoughtful drainage. The footprint must match the plans, and the ground should slope away from the future foundation so water never wants to stand against the house. The superintendent will pull strings, check diagonals, and confirm elevations. Get these inches right now and you avoid expensive corrections later.
Owner checklist for Site Prep
Confirm the house location and finished floor elevation fit your vision for the lot. Walk the approach for deliveries—tight turns, low branches, or soft soils are logistics traps. Ask the builder to show where spoil piles, material staging, and the dumpster will live so neighbors and inspectors stay friendly.
Phase 2: Foundation (Footings, Walls/Slab, and Backfill)
Foundations anchor everything. Depending on design and region, you’ll pour spread footings and stem walls, a full basement, or a monolithic slab. After excavation, forms go up, reinforcement is tied, and inspections verify steel, depth, and code details. Concrete is placed and left to cure; meanwhile, under-slab plumbing, radon piping where required, and vapor barriers are installed. For basements, waterproofing and drain tile wrap the exterior before backfill.
Quality here is geometry and water management. Footings must be at the correct depth and width; walls must be plumb; anchor bolts must land exactly where sill plates will sit. On slabs, vapor barriers and insulation details control moisture and comfort for decades. A careful crew will check elevations with a laser and protect green concrete from early loading.
Where schedules slip in Foundation
Unexpected rock or bad soils slow excavation. Rain turns trenches into pools and pushes pours. Re-inspections add days. Ask your builder in advance for unit prices for rock removal or extra concrete so you don’t pause the job negotiating while the site is open.
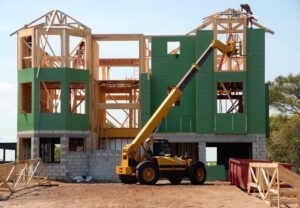
Phase 3: Framing and Dry-In (Shell, Roof, Windows, and Doors)
Framing is the phase you’ll recognize from the road: walls stand, floors stack, and rooflines take shape. Carpenters assemble stud walls, set floor systems, install trusses or rafters, and sheath the shell. Once the roof sheathing is down, crews roll underlayment. Windows and exterior doors follow; then the weather-resistive barrier (WRB) and flashing details tie the shell together. When the roof underlayment, windows, and exterior doors are in, the house is dry-in, and interior work can proceed without weather risk.
This phase is about precision and planning. Rough openings must match the window order; stair geometry, point loads, and shear walls must match the engineer’s details; flashing at sills must be correct or water will find its way inside later. A good superintendent runs a pre-MEP framing walk to confirm blocking for future hardware, backs for grab bars or heavy fixtures, and paths for ducts and chases that won’t clash with beams.
Owner checklist for Framing and Dry-In
Walk the framed rooms and confirm window heights, swing directions for doors, and any built-in nooks. If you want last-minute tweaks to outlet locations or a slightly wider cased opening, now is the time—before the mechanical trades arrive and before changes ripple across every trade.
Phase 4: Rough-Ins (Electrical, Plumbing, HVAC, and Low Voltage)
With structure up and weather kept out, the mechanical trades converge. Electricians pull home runs, set panel locations, and place boxes for switches, outlets, and lights. Plumbers run supply and drain lines and set tubs or shower pans that install before drywall. HVAC installers set air handlers (if inside), run duct trunks and branches, and set up refrigerant line routes. Low-voltage and technology—data, audio, security, camera wiring—follow the main trades.
Rough-ins must clear the path for inspections: framing hold-downs exposed, nail plates protecting wires and pipes where required, and correct clearances at flues and panels. This is also the homeowner’s last best chance to walk the walls and confirm device placement against furniture plans: a bedside switch that’s four inches off becomes a daily annoyance for years. Take pictures of every wall; your future self will bless you during remodels and repairs.
Where schedules slip in Rough-Ins
Late windows or missing tubs block rough-in completion. Unanswered questions about range venting or hood locations create rework. Keep your selections handy, especially for appliances and plumbing trim, so heights, clearances, and blocking land correctly.
Phase 5: Exterior Envelope (WRB, Flashings, Siding, Masonry, and Roofing)
While rough-ins happen inside, the exterior tightens up. Crews install or finish the WRB, integrate window and door flashings, and apply siding, brick, or stucco. Roofing advances from underlayment to shingles, metal, or tile. Penetrations—vents, pipes, flues—receive boots or flashings to shed water.
The exterior is your raincoat. Details at window sills, jambs, and heads determine whether bulk water stays out. On masonry, weep systems and drainage planes must be continuous. Vented rainscreens or furring strips behind cladding can dramatically improve durability in wet climates. Ask your builder to show how the WRB stays intact at complicated junctions like porch roofs and belly bands; neat tape and properly lapped layers are signs of care.
Owner checklist for Exterior Envelope
Confirm siding profiles and exposure widths match selections, and review any masonry mockups for color and mortar joints. Verify roof accessory colors (vents, flashings) complement the roof field; mismatched metals can distract from an otherwise premium finish.
Phase 6: Insulation and Air Sealing
Insulation and air sealing decide comfort and energy performance. Options vary: fiberglass batts, blown-in cellulose, spray foam, mineral wool, and continuous exterior insulation in some assemblies. Whatever the choice, the air barrier must be continuous; that means caulking plates, foaming gaps around windows, sealing top plates, and taping sheathing seams where the WRB doubles as the air barrier. After insulation, most jurisdictions require an inspection; high-performance homes often run a blower-door test to measure air tightness.
This phase is the quiet hero of a comfortable home. A tight envelope keeps conditioned air inside, reduces drafts and dust, and allows HVAC systems to be sized correctly. Sloppy work here undermines expensive finishes later. Ask for a brief walkthrough of critical sealing details before drywall hangs so you see the invisible quality that makes a house feel solid.
Where schedules slip in Insulation
Insulation can’t begin until MEP rough-ins pass and all penetrations are sealed. If a trade needs to come back, the calendar stalls. A clean inspection on the first try is the difference between a right-on-time drywall start and a week of drift.
Phase 7: Drywall (Hang, Tape, Sand, and Prime)
Drywall makes rooms real. Boards hang fast; the tape, mud, and sanding cycles take patience, with drying time between coats. Arch details, niches, and stair soffits get attention now. After sanding, most builders spray a primer coat to even the surface and reveal any flaws that need touch-up.
Quality here is surface planarity and crisp corners. A good crew will protect floors, cover tubs and windows, and keep dust at bay with negative pressure or filtration where practical. If you’ve chosen a higher drywall finish level, expect extra days for additional skim and sanding. Rushing mud to meet a date equals telegraphed seams and waves you’ll see for years.
Owner checklist for Drywall
Walk with good lighting. Look at long walls and ceilings at an angle to spot humps or ridges before paint. Confirm any niche dimensions or built-in recesses match your plans; moving them later is difficult and messy.
Phase 8: Interior Trim, Cabinets, and Tile
With walls up, finish carpentry lands: interior doors, casing, baseboards, crown, window stools and aprons, and stair parts. Cabinets and built-ins install once floors are protected and rooms are stable. Tile crews build shower pans and waterproofing (with flood tests where required), then set tile on floors and walls, followed by grout and caulk. Countertop fabricators template after cabinets are anchored and level.
This is a detail-dense phase where craftsmanship shows. Correct reveals, level cabinets, straight grout lines, and tight miters separate OK from excellent. The superintendent will stage trades to avoid overlaps that cause damage—trim before paint primer, waterproof before tile, template counters before plumbing trim. Good sequencing keeps rework low and quality high.
Where schedules slip in Trim and Tile
Late cabinets stall countertops, which delays plumbing trim and appliances. Specialty tile or stone with long lead times can pause a bathroom. Confirm delivery windows twice: when you order and two weeks before install.
Phase 9: Paint, Flooring, and Finish Surfaces
Painters caulk and fill, then apply finish coats. Flooring—engineered wood, site-finished hardwood, LVP, or carpet—follows either before or after paint depending on type and local practice. If site-finishing hardwood, the house may need controlled temperature and humidity for proper curing. Closet systems, shelving, and minor trims round out the phase.
Paint is equal parts preparation and technique. Well-sanded drywall, clean caulk lines, and dust control yield crisp finishes. On flooring, expansion gaps and proper acclimation prevent future cupping or gapping. Protect finished floors immediately; a single unprotected day can undo weeks of work.
Owner checklist for Paint and Flooring
Confirm sheens by room (bath, kitchen, and trim often differ), and verify final stain samples on actual species and batch of wood. If you have a feature wall or specialty finish, ensure the painter has a sample board and signs off on coverage and technique.
Phase 10: Mechanical Trim-Out, Fixtures, and Appliances
Trades return to trim-out: electricians set devices, switches, and fixtures; plumbers set toilets, faucets, disposals, and water heaters; HVAC techs set registers and thermostats and start up equipment. Appliances install after counters and backsplashes are done. Exterior fixtures and devices complete the shell. Systems get balanced and labeled, and equipment manuals are gathered.
This is where small mis-steps add up. A light fixture box an inch off center, a vanity set too tight to a wall, or a missing GFCI in a wet location leads to punch-list bloat. A sharp superintendent will keep a running list and fix minor misses before they harden into delays at the end.
Where schedules slip in Trim-Out
Late countertops block plumbing connections. A missing range hood or wrong vent kit halts kitchen completion. Coordinate appliance delivery with the builder—staging too early risks damage; staging too late risks missing your final inspections.
Phase 11: Final Inspections, Punch List, and Certificate of Occupancy
As finishes wrap, the builder schedules final inspections: building, electrical, plumbing, and mechanical. Some jurisdictions require blower-door and duct leakage tests; others verify smoke and CO detectors and tempered glass at hazardous locations. Once the inspector signs off, the city issues a certificate of occupancy (CO). In parallel, the builder compiles the punch list—touch-ups, adjustments, paint nicks, sticky doors, missing caulk—and assigns trades to close each item.
Punch lists grow when earlier phases skipped quality gates. A disciplined team enters this phase with a short list and momentum intact. You’ll do a joint walk-through with blue tape and notes; a good builder will capture each item, assign ownership, and schedule completion within a specific window. Final Lien Waivers from the GC and major subs finalize payment and protect your title.
Owner checklist for Closeout
Test every light, outlet, faucet, and appliance. Run every shower, fill every sink, and look for leaks. Open and close every window and door. Check that exterior grading slopes away and gutters discharge as planned. Collect your warranty packet, product registrations, paint formulas, and all keys and codes. Don’t release final payment until final unconditional lien waivers are delivered.
Inspections and Testing Across the Phases
Inspections aren’t a bureaucratic nuisance; they’re a quality scaffold. Expect checkpoints for footings, foundation, framing, rough electrical/plumbing/HVAC, insulation, and finals. Ask your builder to schedule inspections early and to prepare: plans on site, access clear, ladders set, panels labeled. Passing on the first try saves days and reassures officials that the job is under control. For performance-minded builds, add a mid-construction blower-door to catch air leaks while they’re still accessible.
The Critical Path: Tasks That Control Your Timeline
Not every task delays your move-in if it slips. The critical path is the chain where each step’s finish date gates the next: foundation, window delivery, rough-ins passed, insulation and drywall, cabinets, countertops, trim-out, final power/gas, and final inspections. Ask your builder to identify critical items weekly and flag anything at risk. Common killers are late windows, late cabinets, failed inspections, and utilities that take longer than expected to set meters. Protecting the critical path—often by ordering early and making complete decisions—is the single most effective way to hold your date.
How Seasons and Weather Shape the Phases
Weather is schedule gravity. In wet seasons, prioritize getting dry-in quickly; the faster the roof underlayment and windows land, the safer your interior schedule. In freezing climates, masonry and exterior finishes slow or pause; plan those phases for shoulder seasons when possible. In hot, humid regions, allow proper cure and acclimation times for paints and floors. Ask your builder at contract time which phases they aim to place in which months; this isn’t perfection—it’s risk management.
Quality Control Checkpoints You Can Ask For
Every phase has a simple gate that catches expensive mistakes early. After framing, hold a pre-MEP walk to confirm blocking and penetrations; after rough-ins, confirm nail plates and clearances before insulation; after waterproofing, request a shower pan flood test; before cabinets, laser-check floor flatness; before paint, do a prime walk to catch drywall blemishes; before finals, run a systems start-up with the HVAC tech to verify airflow and refrigerant charge. These quick reviews keep punch lists lean and finishes clean.
Owner Decisions by Phase (So You Don’t Slow the Job)
- Pre-Construction: floor plan, elevations, window/door series, roofing, siding, HVAC type, plumbing and appliance models, cabinet line and door style, tile collections, flooring types, lighting intent
- Framing: final window grill patterns, door swings, niche locations, blocking for heavy items
- Rough-Ins: outlet and switch placement, dimmer locations, under-cabinet lighting, exhaust fan models, shower valve heights, hose bib locations, data drops and Wi-Fi plan
- Insulation: confirm insulation type and any upgrades (e.g., sound batts at bedrooms)
- Trim/Cabinets/Tile: cabinet hardware, crown or no crown, tile patterns and grout color, thresholds and transitions
- Paint/Flooring: paint colors and sheens, floor stain and finish, carpet style, stair runner details
- Trim-Out: fixture heights for pendants and mirrors, door hardware handing, appliance panel details
Make decisions on or before the phase that needs them; every day spent choosing while crews wait is a day added to the end.
Typical Durations by Phase (Your Mileage Will Vary)
- Pre-Construction: 3–9 months (design, permits, financing, procurement)
- Site Prep and Foundation: 3–6 weeks (longer with basements or bad soils)
- Framing and Dry-In: 4–8 weeks (design complexity and crew size drive this)
- Rough-Ins: 3–6 weeks (plus inspection time)
- Exterior Envelope: 2–5 weeks (overlaps with interior work)
- Insulation and Drywall: 4–6 weeks (including inspections and drying)
- Trim, Cabinets, and Tile: 4–10 weeks (depends on selections and complexity)
- Paint and Flooring: 2–5 weeks (site-finished wood needs extra cure time)
- Trim-Out and Appliances: 1–3 weeks
- Punch and Finals: 1–3 weeks
These ranges assume decisions are made on time, materials arrive as planned, and inspections pass on the first try.
Budget and Schedule: Why Sequence Saves Money
Faster isn’t always cheaper, but idle time is always expensive. The clearest savings come from ordering long-lead items early, sequencing trades so they aren’t stacked in each other’s way, and eliminating rework through simple quality gates. Rushing drying or curing (concrete, drywall mud, floor finishes) backfires into defects. Aim to remove gaps and friction, not essential time. Track allowances weekly so cost drift doesn’t surprise you at the end when money is tight and decisions are urgent.
Frequently Asked Questions About Construction Phases
What phase causes the most delays?
Most slips trace back to late windows, late cabinets, and failed inspections that force re-work and rescheduling. Utility meter installations can also add days to weeks at the very end. Ordering early, preparing for inspections, and confirming utility timelines up front avoids the worst pain.
When do I lock my selections?
Lock windows, exterior doors, roof, siding, HVAC type, and plumbing/appliance models before ground break. Lock tile, cabinets, and flooring by the end of framing. Lock lighting fixtures during rough-ins. The earlier you decide, the steadier the calendar.
Can I walk the house during construction?
Yes, and you should—at framing (for layout and blocking), at rough-ins (for outlet and lighting locations), at prime (to catch drywall blemishes), and at trim (for cabinet and tile confirmations). Coordinate with your builder for safety and so you don’t disrupt crews.
How do inspections fit the phases?
Expect inspections at footings, foundation, framing, rough electrical/plumbing/HVAC, insulation, and finals. In some areas, add energy and fire checks. Pass on the first attempt by having plans on site, clear access, and someone who can answer the inspector’s questions.
Is modular/panelized construction different in phases?
The site phases are similar (foundation, utilities, inspections), but the framing and dry-in compress dramatically because modules or panels arrive pre-built and set quickly. Interior rough-ins and finishes still follow, just on a shorter track.
Final words
A smooth build is the product of a clear sequence executed with discipline. Every phase of home construction exists for a reason, and each hands the ball to the next: site prep that drains properly, foundations that are square and dry, framing that fits the window order, rough-ins that pass cleanly, envelopes that shed water, insulation that seals the air, drywall that lays flat, finishes that install without damage, and a closeout that leaves you with documents, warranties, and a house that simply works. If you know what each phase demands—and what decisions it needs from you—you’ll replace surprises with steady progress and move in on a date you recognize because you helped earn it.